In this blog post, we are going to see the steps to get started on Helium, with Chirpstack LNS using a RAK11300 module on a RAK wisblock board.
We are just going to setup a device with a LoRaWAN heartbeat to display it on Chirpstack.
Introduction
The RAK11300 is a module based on Raspberry PI RP2040, this is a strong MCU running at 130Mhz, dual core, with 246Kb of RAM,it is not the best solution for going low-power (deep sleep around 200uA) but you can do plenty of things with a such module. It includes a Semtech LoRa transceiver for running LoRaWan application in a single module. It only cost about $6
Setup Arduino environment
For doing this workshop, you need Arduino and you need to install the RAK11300 board environment:
- Install Arduino from the official Arduino website
- Add the specific board into arduino:
For this you need to go in Arduino / Preference and add the following link in the board managers
https://raw.githubusercontent.com/RAKwireless/RAKwireless-Arduino-BSP-Index/main/package_rakwireless_index.json
- Now you can add the specific RAK11300 board, from TOOL > Board Type > Board Manager, search and install RAK11300
Installation takes about 5 minutes, after this you can select the corresponding board in Tool > Board Type > Rakwireless Rpi Modules > Wisblock RAK11300

Create our first program with Arduino and RAK11300
For doing our first program, we are going to load the exemple file provided by RAK, go to File > Examples > …

This example is covering many different things, the default configuration is OTAA and Region EU868, you eventually need to adapt this region setting if you are not in Europe. This program is sending a frame with content “hello” on every 20 seconds (LORAWAN_APP_INTERVAL ms).
You need to install the LoRaWAN-Arduino library, for doing this, just click on the link on the top of the Example code and Select the library names SX126x-Arduino in the list.


Now we need to setup the LoRaWAN identity to access Helium Network
Register to Helium and create your Device IDs
You need to create an account on https://console.helium-iot.xyz this is one of the public Helium LNS, one I personally manage. At the day this blog post is published, this service is still limited to private beta and you need a code to access it. The code will be provided during the Helium workshop this blog post is supporting. On the login page, click on signup, then fill the signup form with an email you will be able to access for validating your registration. Enter the name you want for your tenant in “whatever_you_like” and the “given code” to register your account. This code will allow you to register during the beta period and gives you more credit than a standard account.
 |  |
You will receive an email containing a link to be clicked to validate your account creation. Then you can login into the helium console and add devices.
Create a device profile
We first need to create a device profile, for this we are going to use an existing template. A Device Profile is a group of common setting to be applied to a group of devices. As an exemple, the Radio region is defined by the Device Profile. Click on Device profiles, then on Select device profile template.
Then you need to select the following device template:
Once done, click on OK then on Submit.
Create an application
Now we need to create an application. Application is a group of device having a similar integration behavior. We can have different type of devices or devices on different radio zone sharing the same way to process the data on reception. All are group in the same application. Let’s create an application, give it the name you want.
Create a new device
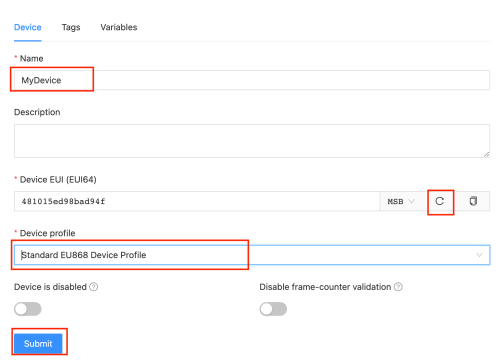
Last step is to create a device in this application, using our Device Profile. From this step we are going to obtain the device IDs ( deveui, appeui, appkey ) required to join the network. The appeui is “0000000000000000”, for the rest, the creation will give it to you.
Complete the creation form, use the random generator to get the Device EUI
Then generate the AppKey with the random generator:
Every thing is now setup, we can configure our device.
Configure credentials
From the Device > Configuration page you can get the DevEui in the MSB.
In this example, the device EUI is 48.10.15.ed.98.ba.d9.4f, you are going to modify the nodeDeviceEUI value ligne 45 of the Arduino programme with the corresponding value. Fill the nodeAppEUI with 8 x 00. In this exemple, the value to set will be:
uint8_t nodeDeviceEUI[8] = {0x48, 0x10, 0x15, 0xed, 0x98, 0xba, 0xd9, 0x4f};
uint8_t nodeAppEUI[8] = {0x00, 0x00, 0x00, 0x00, 0x00, 0x00, 0x00, 0x00};
Now we need to setup the nodeAppKey to terminate the configuration, export as Hex array en past it inside the { }
uint8_t nodeAppKey[16] = {0x2D, 0xF1, 0xE7, 0x4A, 0xF3, 0x0C, 0x0E, 0xC0, 0x24, 0x0B, 0xCB, 0x4D, 0xF4, 0x6D, 0xBB, 0xBF};
Before compiling, you need to fix the bug in the RAK example as follow:
// bool send_now = false;
// becomes :
volatile bool send_now = false;

// and Comment the Serial.println in the following function

void tx_lora_periodic_handler(void)
{
  appTimer.attach(tx_lora_periodic_handler, (std::chrono::microseconds)(LORAWAN_APP_INTERVAL * 1000));
  // Serial.println("Sending frame now...");
  // This is a timer interrupt, do not do lengthy things here. Signal the loop() instead
  send_now = true;
}
Now you can compile and flash the device with Arduino platform… and open the debug console to track what is happening

Watch the results
You can watch the device connecting and sending data on the console log and in parallel watching the Chirpstack logs:
 |  |  |


